 |
| How to manually load PBR Textures into V-ray |
PBR also known as Physically Based Rendering is a texture workflow that uses a simple and compact format to accurately represent real-life materials and how light interacts with different surfaces. It’s compatible with most software options and render engines.
Creating a PBR material is set on several specific textures which in return carry specific data that define different characteristics of the material surface like the color, bump and displacement, glossiness, reflections, and so on.
In this article, I am going to show you a step-by-step guide on how to manually load PBR Textures into V-ray render engine to create realistic materials.
I am going to use the “3D Scanned Marble Floor” PBR material from Textures.com as an example.
You can download this material from here follow along with the tutorial.
______________________________________________________________________________________________
Tip: There are different scripts and plugins that help you load the PBR texture automatically to 3dsmax like:
- Material Texture Loader
This script load in textures, create a material with just a few clicks. Then you can easily apply materials to the Selected object.
You can buy it from here.
- Poliigon Material Converter Add-on for 3DSMax.
While this add-on is free, you can only use it with the textures you downloaded from Poliigon.
You can download it from here.
____________________________________________________________________________________________
Select the VRayMtl from the Vray materials menu.
The most used PBR texture workflows are metallic / roughness and specular / glossiness. The workflow you should follow generally depends on the source of your PBR material and how it was created. Texutres.com generally uses the roughness workflow, while the textures in the CGaxis store follow the specular / glossiness workflow.
The metallic / roughness workflow usually consist of three main texture maps (Diffuse, Roughness, Metalic)
The specular / glossiness workflow consists of (Diffuse(Albedo), Glossiness, specular) texture maps.
Other maps are common to both workflows like (Ambient Occlusion, Normal map, Height map, and opacity map)
In this example, we are using a textures.com material. So we will select “Use Roughness“ under the BRDF Rollout in the material editor.
connect the Albedo map to the Diffuse Slot.
Create a new layer in the composite map the connect your diffuse map to the bottom layer.
Connect your AO map to the top layer then set the blending mode to multiply.
*While loading the (Normal, Roughness, and height) maps, make sure to check the “Override” button under the gamma options. This will ensure that the data in the map won’t be interpreted as colors.
Connect the VrayNormalMap to the bump slot.
Then connect the Normal Map to the VrayNormalMap node.
*Don’t forget to set gamma to override when loading the texture.
Connect the height map to the displacement slot. Then you can play around with the height value until the object's surface looks the way you want.
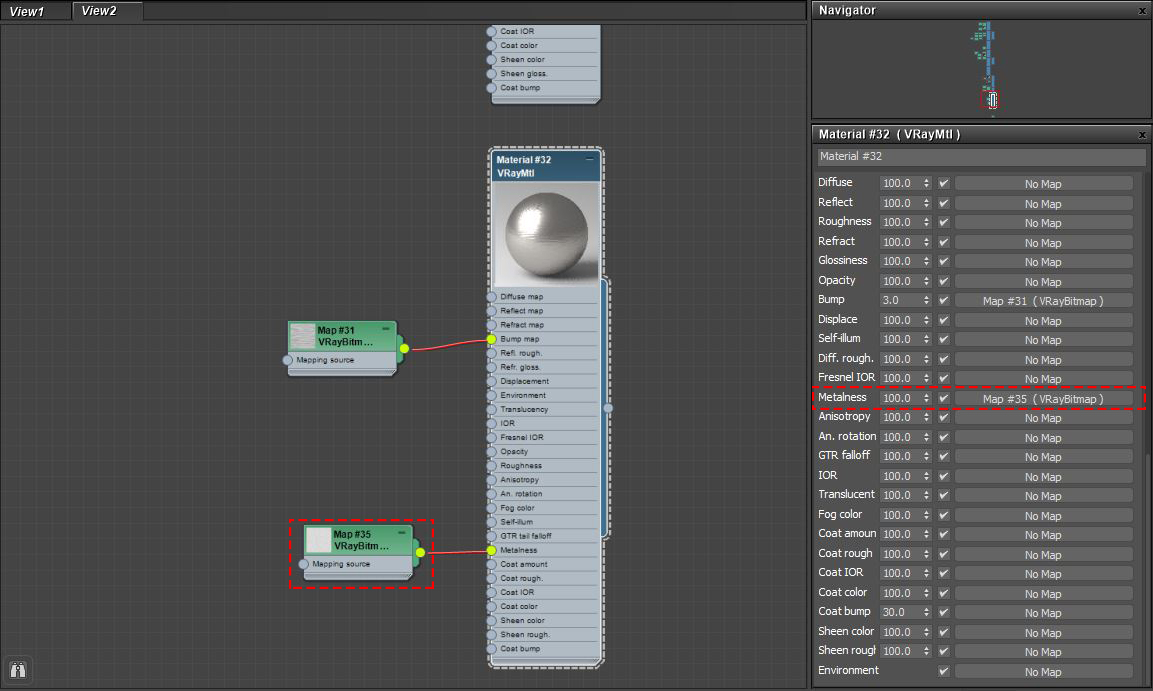
*If you aren’t using metallic materials, you can skip this step. Connect the Metallic Map to the Metalness slot. In that case, the reflection color has to be completely White.
- specular / glossiness WorkflowIf your PBR material was created under the specular / glossiness workflow:
- Choose “Use Glossiness” under the BRDF Rollout in the material editor.
- Connect the Glossiness map to the Glossiness slot, then connect the Specular map to the reflect slot.
 |
| Final Result |


Post a Comment